Download Timelapse
The Timelapse software
Three installation methods are available (see technical details)
- Choose the installation method that best fits your environment.
- Download Timelapse. Over-ride warnings (if any) that inhibit the download
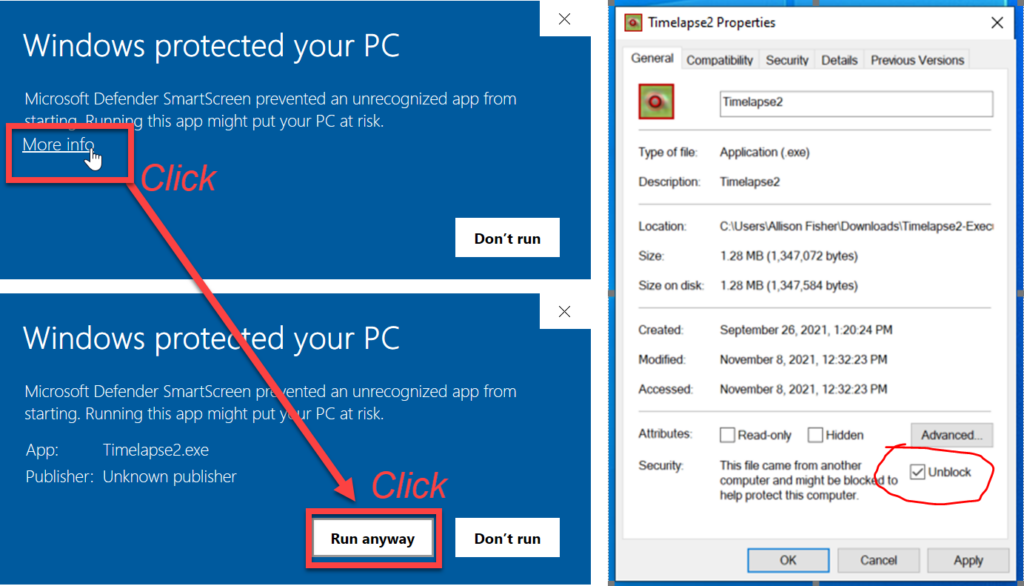
Note: some browsers show warnings and further instructions only after you click the download or … icon. - Bypass Windows Security. Windows may display a security warning when running a new installer version or Timelapse executable for the first time. To over-ride the warning:
- select More Info, then select Run Anyways.
- Or, if the Run Anyways button did not appear, open the folder containing the executables. Right click each Timelapse executable in that folder, select Properties, and checkmark the Unblock checkbox located at the lower left.
Why security workarounds? Browsers and Windows sometimes raise security roadblocks on downloaded software. This warning will eventually disappear as Timelapse is now code-signed, which guarantees certain security aspects such as trust and that the app has not been altered.
1 MSI Per-User Installer (recommended for most users)
Install Timelapse only to your user account. Suitable for those running Timelapse on a personal computer, or those who are on an instutional computer but just want to install it for themselves. Admin priviledges not required. Includes Microsoft .Net 10.
2 MSI Per-Machine Installer (IT / Enterprise)
For system-wide managed deployment. Install Timelapse so all users on a computer can run it. Suitiable for IT staff or users with admin accounts who want to install it machine wide and have smaller downloads . Admin priviledges required for installation. Requires separate installation of Microsoft .Net 10 Desktop runtime X64 if not already installed. See IT Deployment Note for silent install, checksums and other details.
3. Timelapse as a zip file (Portable, no footprint)
Suitable for cases where msi installers are prohibited, or for those wanting full control of file location, shortcuts, etc. Should work unless IT disallows downloaded executables. Includes .Net 10.
- Extract the software. Open the zip file by double clicking it and extract the Timelapse folder to a location of your choosing.
- Follow the instructions in README-Instructions.txt in that folder. It describes how to create shortcuts and file associations to Timelapse.
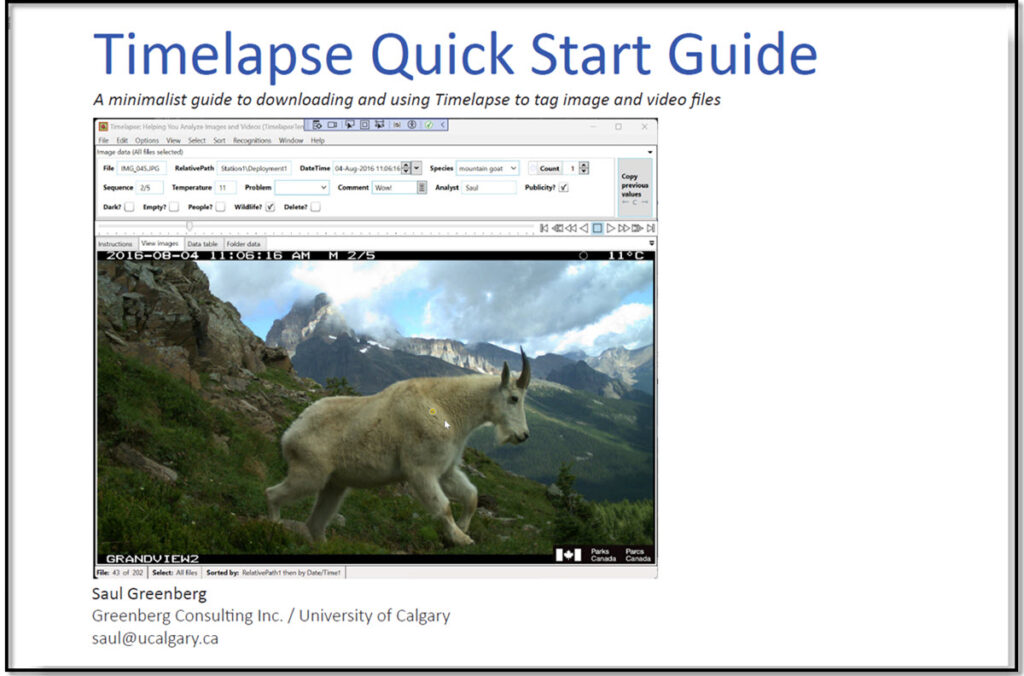
Timelapse Quick Start Guide
If you are new to Timelapse, you will benefit from going through the Timelapse Quickstart Guide. Use Timelapse as you read its step by step tutorial, where you can try it on the images and videos found int the downloadable Practice image set. You will learn various Timelapse features and understand its basic workflow.
Beyond QuickStart. The Learn page lists other Timelapse guides. Each provides additional details or covers advanced Timelapse topics. Guides include: a Reference guide detailing many Timelapse features, a Template Editor Guide on constructing your own data fields, an Image Recognition Guide on how to use image recognition, a Metadata Guide on how to create richer hierarchical data fields and use metadata standards, and a Database Guide specifying the internal structure of Timelapse files.
A Video page provides tutorials and lessons on how to use particular Timelapse features.
These guides are definitely worth at least a quick read, and the videos are helpful. You will gain insight into the many different ways you can use Timelapse which will help you make your workflow as efficient and easy as possible.

Troubleshooting: If Timelapse won’t run…
In the majority of cases, Timelapse should install and run without issues. If it doesn’t, here are some possible reasons and solutions.
You have a locked down computer. Various organizations will lock down their computers, where the computer is configured to only run permitted applications. If Timelapse is not one of these, you will not be able to run it. As well, some organzations may also limit what you are able to download (e.g., they may prohibit .msi installars or zip files).
Solution. Talk to your IT staff. They may want additional information before allowing this, as their goal is to ensure system security (see IT Deployment Note, and tell them they can contact me directly if needed). While you wait for your organization to sort this out, you can always run Timelapse on your own personal computer or laptop if you have one.
You are missing .Net 10. Timelapse requires the Windows .Net 10 Desktop runtime (x64), which is not included in the MSI Per-Machine Installer . You will have to download and install it separately. This normally requires admin priviledges.
Solution. Go to.Net 10 Download page and select .NET Desktop Runtime. Windows x64.
You don’t have an admin account which is required for the MSI Per-Machine Installer .
Solution. Use the MSI Per-User Installer as that does not require admin priviledges. If you really do need Timelapse installed machine-wide, change your user account settings to admin. If its an institutional computer, you may have to ask IT to do it.
Beta versions of Timelapse are sometimes found at this link. But none are available now.